

Windows 11 is a fantastic operating system with an elevated demand regarding its new features, usability and aesthetics. However, if your device is getting old or not performing optimally, then the Windows 11 lite version can be useful for your usage.
Windows 11 home lite is not an official edition that you can visit the Microsoft website and download. You should need a valid product key to activate Windows 11 lite OS. This article educates you about Windows 11 lite download and how to install it in a proper way.
What is the Windows 11 Lite Edition?
Windows 11 lite is a refined custom edition of Windows 11. It is built to circulate on less RAM and storage computers; It requires only 8 GB of storage space and 2 GB of RAM, whereas Windows 11 requires 20 GB of Storage and 4 GB or more RAM.
Windows Tiny 11 was introduced by NTDev. As you heard above, lite Windows 11 has fewer resources than Windows 11, like Swift animations. You will not find other apps like Windows Defender, Xbox and others. Removing these high-voltage features from Windows 11 lite OS makes it faster to use and power efficient. Find out more about this topic, read this whole informative post.
Why Do You Install Windows 11 Lite Version?
Using Windows 11 lite version or Windows Tiny 11, you need to do a manual update, and you don’t get any customer assistance. Apart from all, Windows lite 11 is a great OS, and why you should use it look in below:
- It becomes a light OS to mitigate bloatware.
- You can enjoy Windows 11 if you are using an old PC.
- Windows Tiny 11 doesn’t require rigid hardware requirements like Windows 11.
- Only 2 GB RAM and 8GB storage are enough to run Windows Tiny 11.
- Windows 11 home lite can’t force you with security issues like the Trusted Platform module does on a PC.
Moreover, lite Windows 11 has many updated features you can utilize on your underperforming PCs with a softer system demand.
Comparison Between Windows 11 Vs Windows 11 Lite
If you are willing to use Windows 11 lite, you should know how it will serve you more than other potential Operating Systems. Here we have enlisted a comparison between Windows 11 and Windows 11 lite OS versions, as both are the latest version of Windows.
| Specifications | Windows 11 | Windows 11 Lite |
|---|---|---|
| Version | Official Version of Microsoft | Experimental version |
| Speed | Not as fast as the Lite version | Quick and lite version |
| Customer Support | Official support | No official support |
| Update | Auto-update available | Manual Update |
| Storage Space | 20 GB | 8 GB |
| RAM Required | 4-8 GB | 200 MB-2 GB |
| Security | Security boot, related hardware | Ditches TPM and similar security |
| Apps | Updated Apps | Not supported heavy apps |
It is essential to inform you if you can’t install Windows Tiny 11 accurately, there’s a high chance of security risk, and it can break your system, also.
How to Install Windows 11 Lite
This point enlightens you with different segments – These are: Download, Create partition, moving iso to PenDrive, and Installation process. Let’s start the tour:
Step 1: Windows 11 Lite Download
- Download your Windows lite from 22621.1265 or 22621.525 from UUPDump
- Also, you can directly download Windows ISO version 22H2 from the Microsoft official website.
- Go in this direction and select version x64 or arm64: Search->Information->System Type.
- Mount the ISO file like the image.

- Now, move on to the Tiny11 Builder GitHub Page.
- Click on the code at the right of the display to download the Tiny 11 Builder tool and Download the ZIP, as the photo illustrates below.
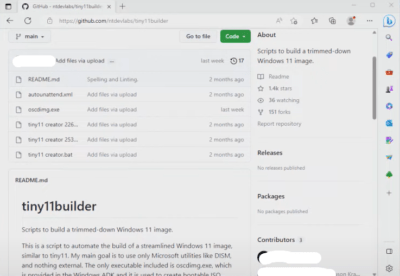
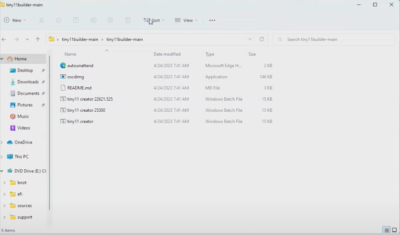
- On the ZIP file, click Extract All and save it to a convenient drive on your computer.
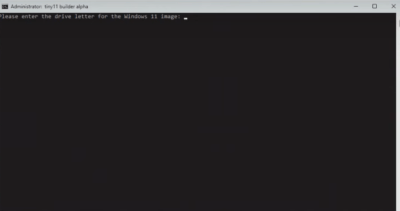
- If you download the 22621.525 editions, run tiny11 creator 22621.525.bat as an administrator; otherwise, working with the 22621.1265, you need to use the tiny11creator.bat script.
- If Microsoft Defender SmartScreen interrupts your work, click on More Info and select Run Anyway.
- Submit the Drive Letter when the administrator terminal is open, then press Enter to complete the process.
- You have to provide an image index. If you have multiple images in your drive letter, you may select just one to work with. If any additional images are not available to you, your index number should be 1.
Once you’ve completed the process, your iso file will be prepared, and you can use it when you run the .bat file.
Step 2: Create a Partition to Install Windows 11 Lite Version
- To create a partition, move to Control Panel->System & Security->Administrative Tools
- Under Computer Management, choose the Storage option.
- Tap on Disk Management and click on the unallocated place to make a partition.
- If your device has not enough space to allocate, then tap on the Shrink Volume.
- Having unallocated space, select the New Simple Volume option.
- Give a name to your New Drive of your choice for the sake of convenience.
- After setting up the whole process, click on Finish, and a new partition will be created.

Step 3: Move ISO Files on a Pen Drive
Moving your ISO file onto a Pen Drive to facilitate the installation process. In that case, download Rufus to ease your work. Once you get Rufus in your PC, connect your Pen Drive and follow the steps below:
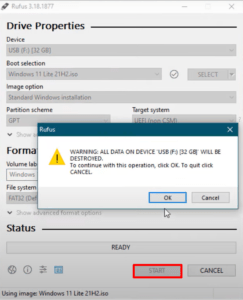
- Open Rufus, now select your Pen Drive and click on the drop-down menu.
- You need to select the ISO image in the boot selection.
- Select the Folder where you saved the file and click to Open the file.
- You don’t need to change anything; click on Start.
- If Rufus asks permission to format, tick OK. This process will take 10 to 15 minutes.
- After getting the message ready, click on Close and withdraw your Pen Drive.
Step 4: How to Install Windows 11 Lite OS
For installing the Windows 11 lite iso download 64-bit, follow the below process:
- Power on your computer to press the start button, and keep pressing the BIOS key (This key depends on your device) to open.
- You may also find the BIOS settings by searching Change Advanced Startup Options on the Windows search bar.
- Tap on Restart Now; use your keyboard only for preparing the BIOS setup.
- Opening the BIOS window, go to the Boot Order menu and choose the Pen Drive you have inserted to boot.
- Your device is ready for Windows setup; just follow the usual steps.
- You’ve come to the position of select partition; the one you selected earlier, select that.
- The setting process might take some time to complete, and it depends on your computer’s current state.

That’s all for installing Windows 11 home lite on your device and ready to go.
What Will You Need for Windows 11 Lite ISO
During the installation process starts, keep in mind a few things to install effectively:
- Using free utility software Rufus and creating a bootable USB drive.
- Dealing with ISO images, keep a Pen Drive for further assistance in moving your files.
- Create a partition that will be useful to store files and use a 2-core CPU in this regard.
Many unnecessary apps like Office Hub, Media Player, Clipchamp and others are removed from the Windows lite version, while Teams and Cortana remain. Xbox has also been deleted, but the provider of this game will be available; you can easily reinstall the game if you are a game lover. Don’t stress to see Microsoft Edge on your browser; it is just a dummy version; this Edge is already removed.
If you are talking about languages, you may find the US edition is only supported by Windows lite 11. For more languages, you will have to add them manually.
Final Lines
Installing Windows 11 lite, you might think this process is complicated. If you can fulfil the installation of ISO files, you may find it simple. Once you download and install the lite Windows 11 by our provided instructions, your device could save more space.
It’s true you’ll get no support from Microsoft automatic updates about Windows 11 lite version, but if your device has Windows or security problems, you should try this. Thank you for reading this.